|
|
Home | Equipment | Images | Links | Tips | Contact |
Flatfieldbox
Portable Flatfieldbox
 |
||
|
Wer sich mit dem Thema CCD-Fotografie beschäftigt, kommt früher oder später nicht um das Thema des Flatfields herum. Diese werden benötigt um die durch die optischen Elemente in der Aufnahme induzierten Fehler zu korrigieren. Hierzu zählen Vignettierung oder auch Staub auf Filtern oder dem CCD selbst. Ein Flatfield wird gewonnen indem man die Optik auf eine gleichmäßig helle Fläche richtet und dann so belichtet, dass die Pixel etwa 30-50% Sättigung erreichen. Auf die genauen Hintergründe der Flatfieldkorrektur möcht ich an dieser Stelle nicht genauer eingehen. Hier möchte ich auf entsprechende Literatur oder diverse Quellen im Internet verweisen. Wie erwähnt benötigt man zur
Erstellung eines Flatfields eine gleichmäßig helle Fläche. Dies
gestaltet sich jedoch meist recht schwierig. Häufig werden Flatfields in
der Dämmerung gegen den Himmel im Zenit gewonnen. Dies hat jedoch ein
paar entscheidende Nachteile. In der Dämmerung ändert sich die
Helligkeit des Himmelshintergrundes meist sehr rasch, so dass Aufnahmen
mehrerer Flatfields alle unterschiedlich belichtet werden. Außerdem kann
es vorkommen, dass die Himmelshelligkeit unter die Sternhelligkeit
sinkt. Damit werden Sterne auf dem Flatfield sichtbar, die dann zu
dunklen Stellen bei der Korrektur führen. Diese Flats sind dann
unbrauchbar.
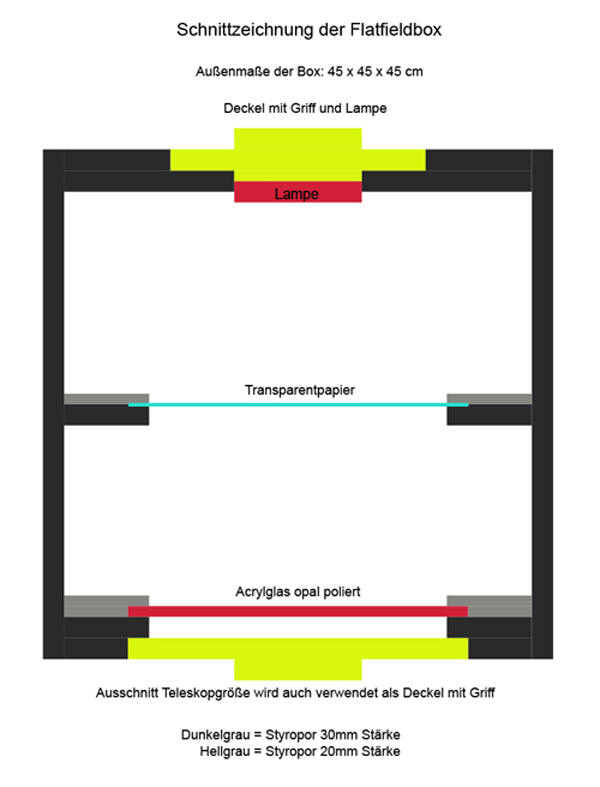
Für den Bau meiner Flatfieldbox habe ich Styroporplatten 1000x500x30mm verwendet. Als Beleuchtungsquelle verwende ich eine batteriebetriebene Campinglampe mit 36 LED (24 LED im Außenring, welche schräg angeordnet sind und 12 LED im Innenring). Als Diffuser habe ich Transparentpapier und eine polierte Opalglasscheibe 300x300x3mm verwendet. Nach mehreren Testreihen hatte ich die richtige Lösung der Tiefe der Box sowie den Abstand von Lichtquelle zu den Diffusern gefunden. Die fertige Box hat nun die Maße von 45 x 45 x 45 cm. Der erste Diffuser mit Transparentpapier befindet sich in einem Abstand von 15 cm zur Lichtquelle und der zweite Diffuser mit einem Abstand von 30 cm zur Lichtquelle. Gewicht der Flatfieldbox ca. 1,5 kg. Der Preis der Flatfieldbox kommt insgesamt aller Materialien auf ca. € 25,- Materialliste: Die Innenöffnung der Flatfieldbox ist quadratisch um genügend Ausleuchtung am Rand durch die eckige Form zu erhalten. Die Box wurde zusätzlich mit einem Powerstripband verklebt um sie vor Feuchtigkeit zu schützen und um nicht andere Hobby-Astronomen bei der Gewinnung der Flatbilder im Freien zu blenden. Flatbild mit der Meade DSI II
Pro Belichtungszeiten für Flatfields mit dem H-Alpha Filter halten sich auch hier eher kurz (im Sekundenbereich). Großen Dank an meine Astro-Kollegen Günther Petz und Martin Helm beim Gelingen des Projektes Flatfieldbox, jeder hat seinen Wissen eingebracht, um ein positives kostengünstiges Ergebnis zu erreichen.
|
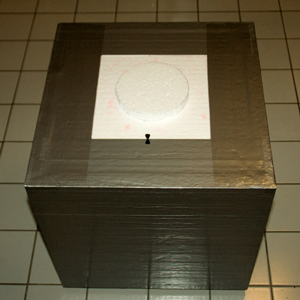 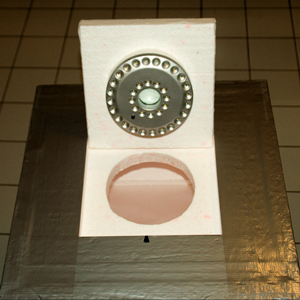 Flatfielbox von oben Top of the flatfieldbox 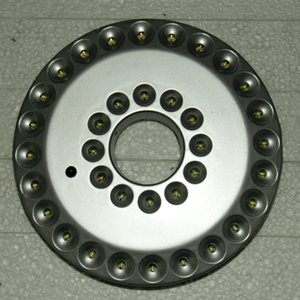 Campinglampe mit 3 Beleuchtungsmodi Camping lamp with 3 illumination modi 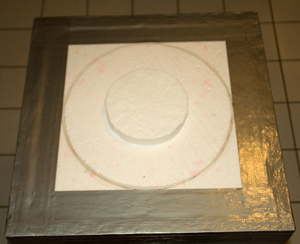 geschlossene Flatfieldbox von unten Bottom of the flatfieldbox with cover  Flatfieldbox von unten Bottom of the flatfieldbox 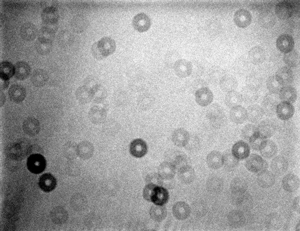 Belichtungszeit bei der DSI II Pro 0,0625 Sek. mit IDAS LPS2 - Filter 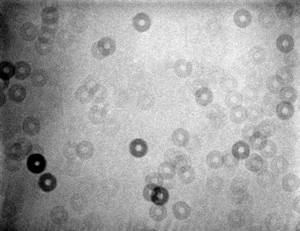 Belichtungszeit bei der DSI II Pro 0,250 Sek. mit RGB - Filtern |
Who concerns itself with the topic CCD photography, does not come around sooner or later around the topic of the Flatfields. To correct this necessarily around the errors induced by the optical elements in the admission. For this vignettation or also dust on filters or the CCD counts. A Flatfield won by one the optics toward an evenly bright surface directs and then in such a way exposed that the pixels reach about 30-50% saturation. On details do not background the Flatfieldkorrektur moecht I here are more exactly received. Here I to appropriate literature or various sources in the InterNet would like to refer. As mentioned one needs an evenly
bright surface for the production of a Flatfield. This becomes however
usually quite difficult. Frequently Flatfields in the dawn are won
against the sky in the zenith. This has however a few crucial
disadvantages. In the dawn the brightness of the sky background changes
usually very rapidly, so that photographs of several Flatfields all are
differently exposed. In addition it can occur that the sky brightness
sinks under the starbrightness. Thus stars on the Flatfield become
visible, which leads then to dark places with the correction. This
Flatfield is then useless.
For the building of my Flatfieldbox I used polystyrene plates 1000x500x30mm. As lighting source I use a battery-operated camping lamp with 36 LED. As diffuser I used tracing paper and an polished opalglass 300x300x3mm. After several test rows I had found the correct solution of the depth of the box as well as the distance from source of light to the diffuser. The finished box has now the measurements of 45 x 45 x 45 cm. The first diffuser (tracing paper) is in a distance from 15 cm to the lamp and the second diffuser (opalglass) 30 cm. Weight of the Flatfieldbox approx. 1.5 kg. The price of the Flatfieldbox comes altogether all materials to approx. € 25.-
The interior opening of the Flatfieldbox is square to bring sufficient illumination at the edge by the angular form. I have covered the box with a Powerstrip tape to save it from the humidity also not to disturb other hobby-astronomers that shine through the polysterine plates. Flatfield with the Meade DSI II
Pro Exposure times for Flatfields with the h-alpha filter keep themselves also here short (within the second range). Many thanks to my astro-colleagues Guenther Petz and Martin Helm with the success of the project Flatfieldbox, everyone brought in its knowledge, in order to achieve a positive economical result.
|
Zurück zum
Seitenanfang
Back to top